RESTful CRUD using Node.js | Express.js | MongoDB

Welcome to the comprehensive guide to build RESTful CRUD (Create, Read, Update, Delete) API using the powerful trio of Node.js, Express.js, and mongoDB.

  • Node.js: Node.js is a runtime environment that allows developers to execute JavaScript code server-side, enabling the building of fast and scalable network applications.
  • Express.js: Express.js is a web application framework for Node.js that simplifies the process of building web applications and RESTful APIs by providing a robust set of features and middleware.
  • MongoDB: MongoDB is a NoSQL database that uses a document-oriented data model, making it flexible and scalable for storing and managing structured and unstructured data in modern applications.

Github Link for Source Code of CRUD API : https://github.com/arjungautam1/Express-CRUD

Step 1 : Create project and install npm packages

First, create a folder let’s call it crud and open it any code editor. I will use VSCode for this tutorial; you can use any code editor like WebStorm or Atom. Now Open the terminal in VSCode, then type:

npm init 

Keep everything as default or you can provide some fields like author or description. If you keep on pressing enter this will create a file called package.json. 

Now install npm packages :  body-parser for parsing incoming request bodies in middleware functions, dotenv for loading environment variables from a .env file, and express for creating web applications and APIs in Node.js. mongoose for modeling and interacting with MongoDB databases in Node.js applications, providing a schema-based solution for organizing data and facilitating CRUD operations with ease.For that type the following command on terminal : 

npm i express dotenv body-parser mongoose

Also install Nodemon as dev dependency :  Nodemon is a utility that monitors changes in your Node.js application files and automatically restarts the server upon detecting modifications, facilitating a streamlined development workflow.

npm install --save-dev nodemon 

Now let’s some changes on package.json : add type: “module” just below main:”index.js” and change start:”nodemon index.js” inside scripts as shown below 

{
"name": "crud",
"version": "1.0.0",
"description": "crud",
"main": "index.js",
"type": "module",
"scripts": {
"start": "nodemon index.js"
},
"author": "code with arjun",
"license": "ISC",
"dependencies": {
"body-parser": "^1.20.2",
"dotenv": "^16.4.4",
"express": "^4.18.2",
"mongoose": "^8.1.3"
},
"devDependencies": {
"nodemon": "^3.0.3"
}
}

Step 2 : Create database using MongoDB Compass

First make sure to install monogoDB and mongoDB Compass on your operating system. If you haven’t installed yet I have dedicated video for the installation first go through these video to install : 

Install MongoDB and mongoDB Compass on
Windowshttps://youtu.be/jvaBaxlTqU8
Install MongoDB and mongoDB Compass on Machttps://youtu.be/MyIiM7z_j_Y
Install MongoDB and mongoDB Compass on Linux (Ubuntu) : https://youtu.be/ZiQPyD82ojk

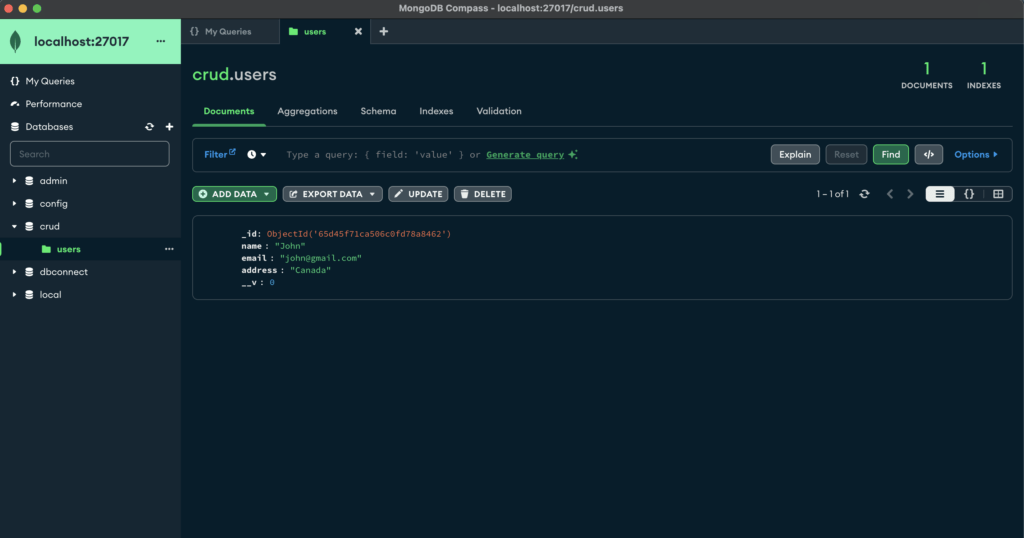
Once you install mongoDB and mongoDB Compass create database using mongoDB compass. Let’s call it crud and give the collections name users. I also have dedicated blog on this topic.

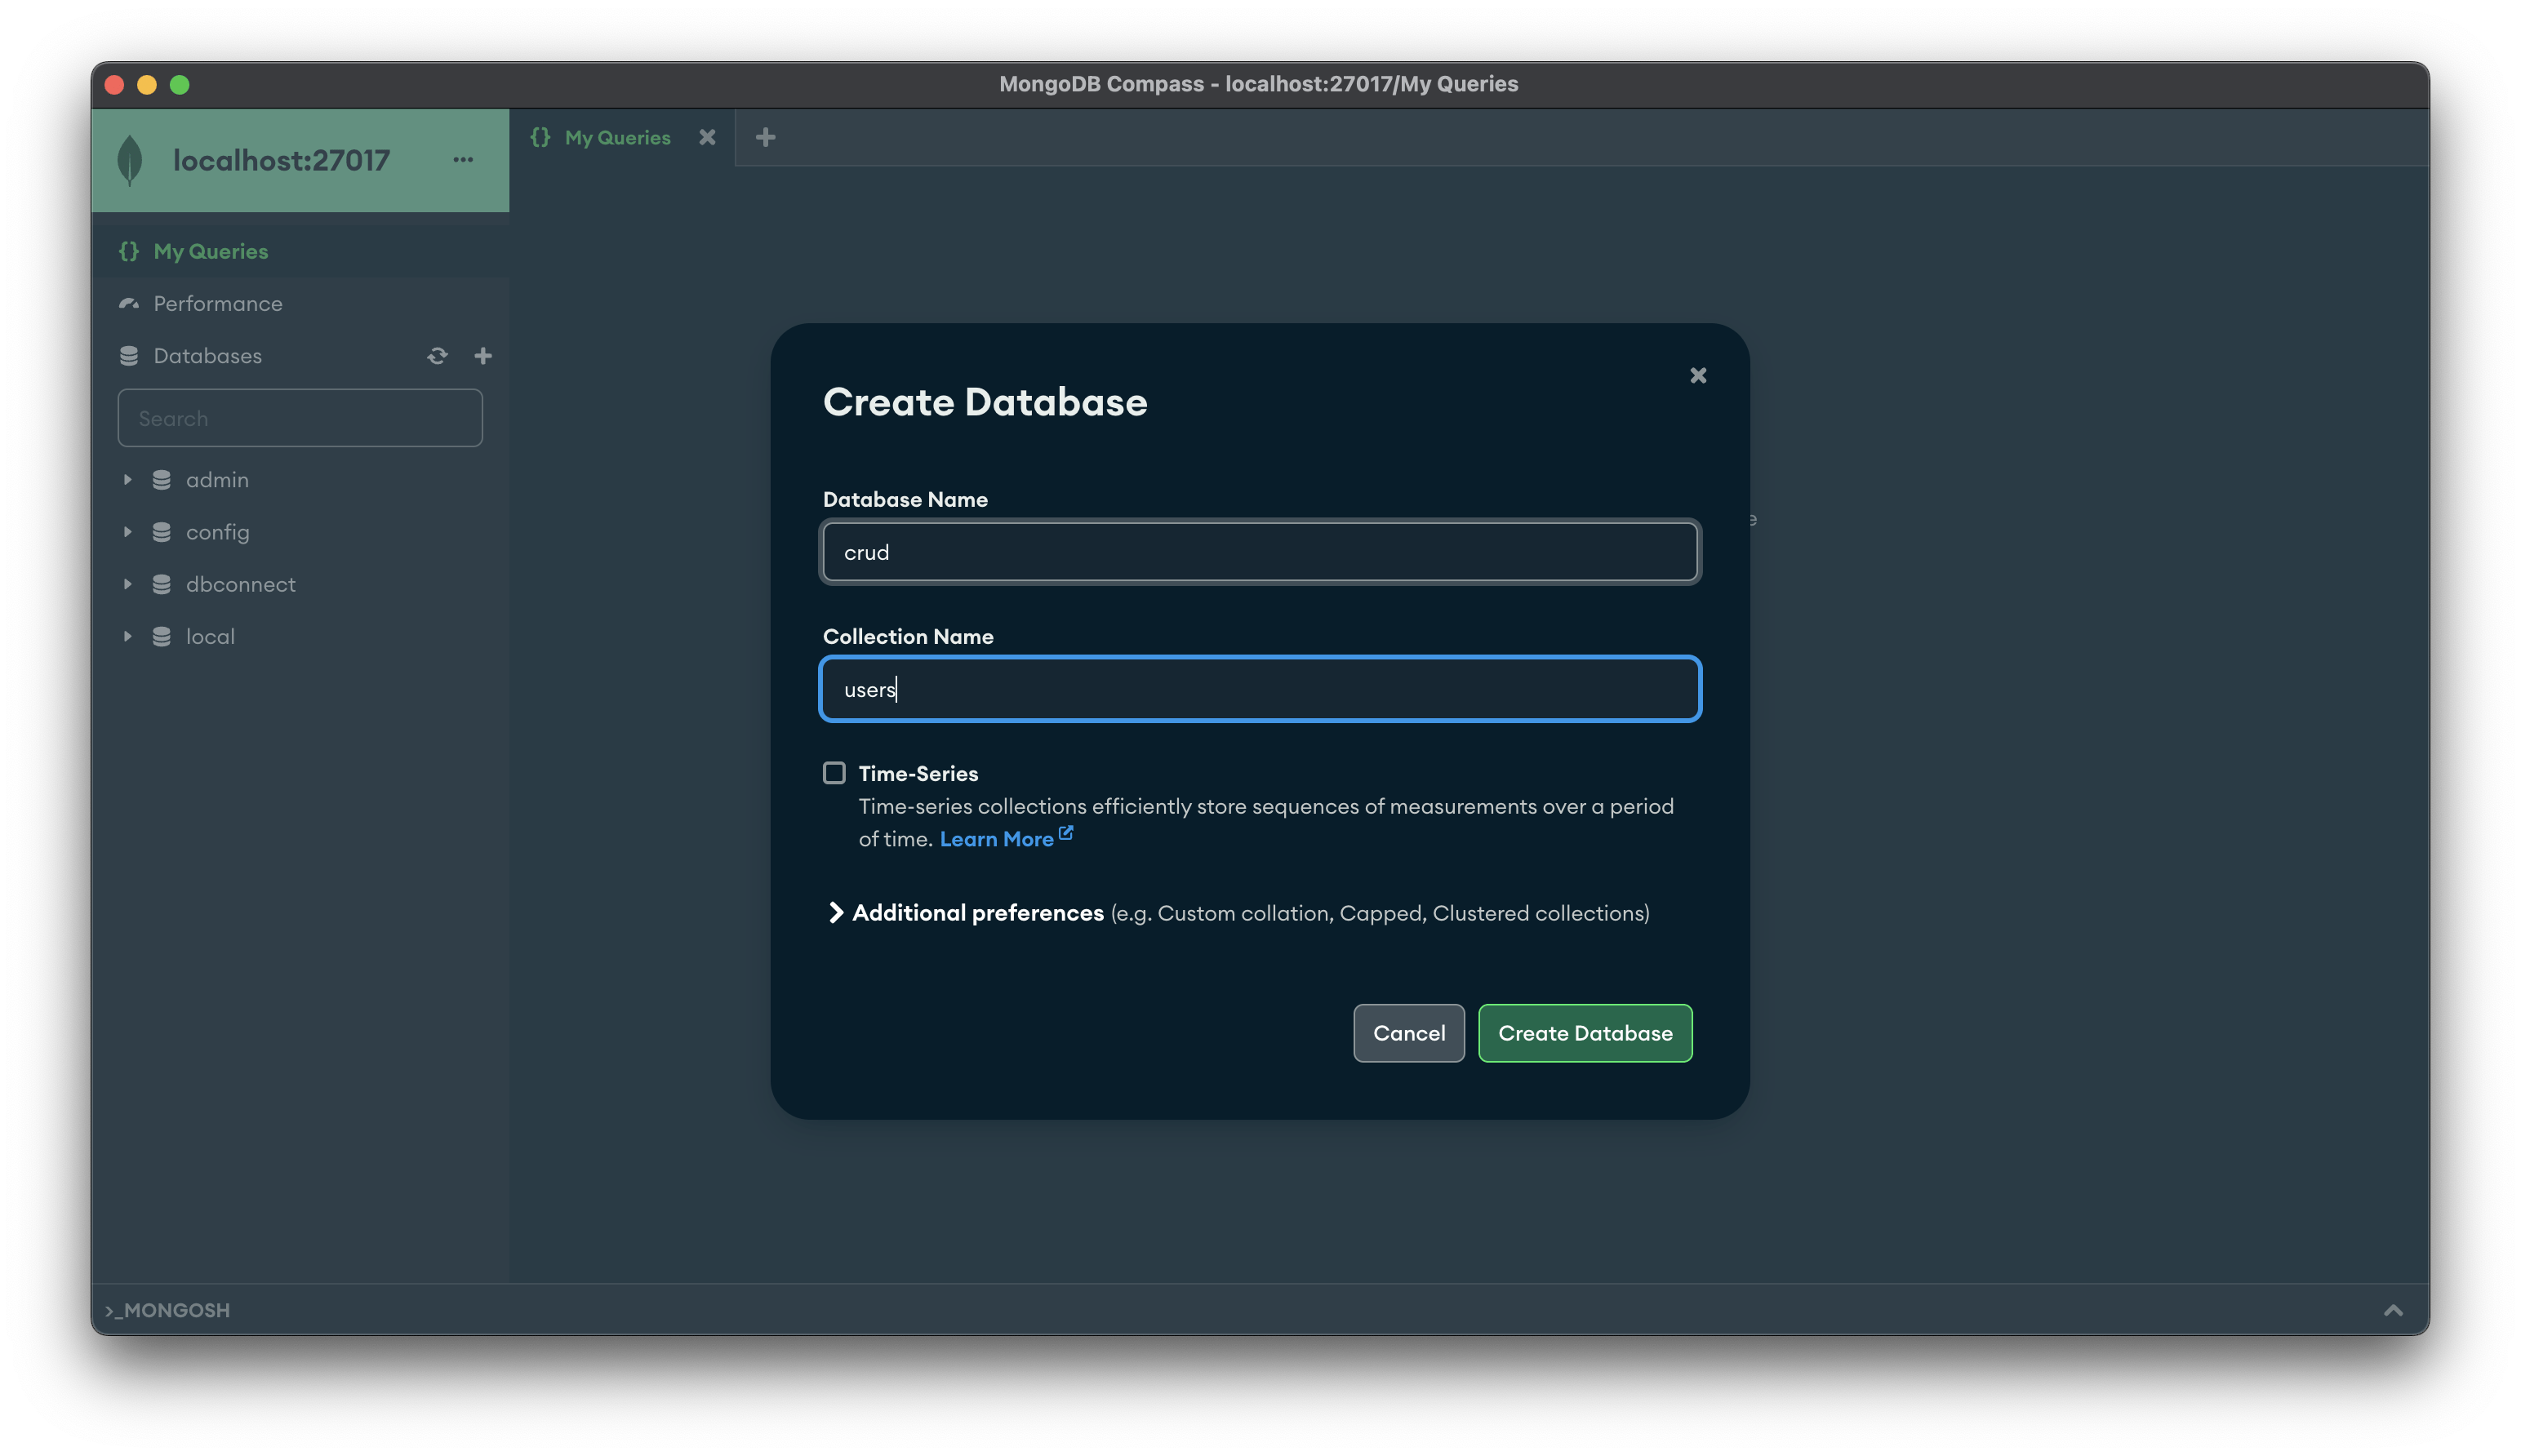
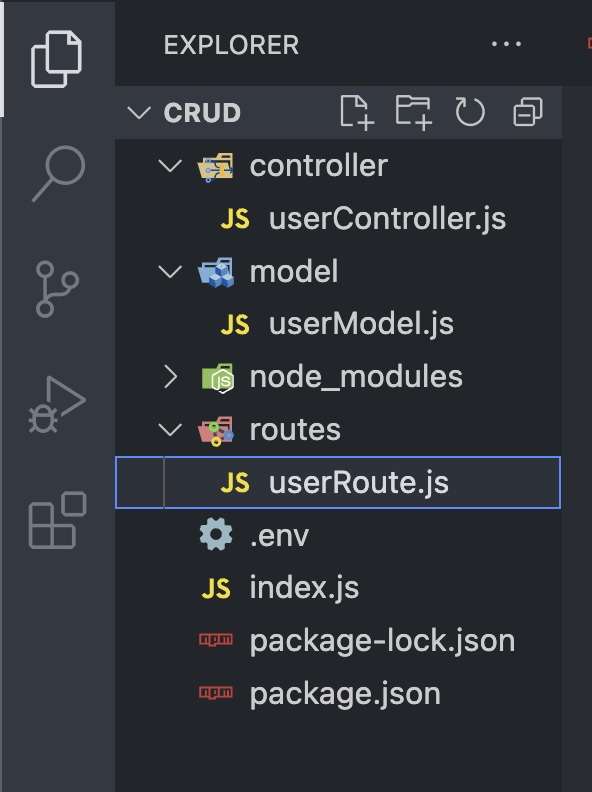
Now let’s create .env in the crud folder to add the database configuration and port. 

Step 3 : Connect express.js with mongoDB

PORT=8000
MONGO_URL = "mongodb://localhost:27017/crud"
view raw .env hosted with ❤ by GitHub

Now create a index.js file and here will write code to connect express.js with mongoDB database in following steps : 

  • Import necessary modules
  • Initialize Express app
  • Create Middleware for parsing JSON request bodies
  • Load environment variables from .env file
  • Write code for Connecting MongoDB database
// Import necessary modules
import express from "express"; // Import Express framework
import mongoose from "mongoose"; // Import Mongoose for MongoDB interactions
import bodyParser from "body-parser"; // Import Body-parser for parsing request bodies
import dotenv from "dotenv"; // Import dotenv for loading environment variables
// Initialize Express app
const app = express();
// Middleware for parsing JSON request bodies
app.use(bodyParser.json());
// Load environment variables from .env file
dotenv.config();
// Define port for the server to listen on
const PORT = process.env.PORT || 5000;
// Define MongoDB connection URL from environment variables
const MONGOURL = process.env.MONGO_URL;
// Connect to MongoDB database
mongoose
.connect(MONGOURL)
.then(() => {
console.log("Database connected successfully."); // Log successful database connection
// Start server on specified port
app.listen(PORT, () => {
console.log(`Server is running on port : ${PORT}`); // Log server running message
});
})
.catch((error) => console.log(error)); // Log error if database connection fails
view raw index.js hosted with ❤ by GitHub

Now if you type npm start in terminal you will see the message database connected successfully and server is running on port :8000

Now create the folder structure:

  • model -> userModel.js for defining the schema and model for the user data in MongoDB.
  • controller -> userController.js for handling the business logic and interaction with the userModel.
  • routes -> userRoute.js for defining the routes and mapping them to the appropriate controller methods for user-related operations.

Step 4 : Create Model or userSchema

Now create user schema with properties name, email and address. Then create and export the Mongoose model for the “users” collection based on the userSchema.

import mongoose from "mongoose";
// Define the schema for the user entity
const userSchema = new mongoose.Schema({
// Define the name property with type String and required constraint
name: {
type: String,
required: true,
},
// Define the email property with type String and required constraint
email: {
type: String,
required: true,
},
// Define the address property with type String and required constraint
address: {
type: String,
required: true,
},
});
// Create and export the Mongoose model for the "users" collection based on the userSchema
export default mongoose.model("users", userSchema);

Step 5 : Create UserController

Now Let’s write code for controller file. It receives HTTP requests from the routes defined in userRoute.js, such as requests to create, read, update, or delete user data.

  • First import userModel.js as User 
  • Then write code for posting data into database, getting all the users from database, then for updating the data from database and deleting the data from database. 
// Import the User model from userModel.js
import User from "../model/userModel.js";
// For posting data into the database
export const create = async(req, res)=>{
try {
// Create a new User instance with the request body
const userData = new User( req.body);
const {email} = userData;
// Check if a user with the same email already exists
const userExist = await User.findOne({email})
if (userExist){
return res.status(400).json({message : "User already exists."})
}
// Save the new user data into the database
const savedUser = await userData.save();
// Send a success response with the saved user data
res.status(200).json(savedUser)
} catch (error) {
// Handle any errors and send an internal server error response
res.status(500).json({error : "Internal Server Error. "})
}
}
// For getting all users from the database
export const fetch = async (req, res)=>{
try {
// Find all users in the database
const users = await User.find();
// If no users are found, send a 404 error response
if(users.length === 0 ){
return res.status(404).json({message : "Users not Found."})
}
// Send a success response with the fetched users data
res.status(200).json(users);
} catch (error) {
// Handle any errors and send an internal server error response
res.status(500).json({error : " Internal Server Error. "})
}
}
// For updating data
export const update = async (req, res)=>{
try {
// Extract user id from request parameters
const id = req.params.id;
// Check if the user with the given id exists
const userExist = await User.findOne({_id:id})
if (!userExist){
return res.status(404).json({message : "User not found."})
}
// Update the user data and return the updated user
const updateUser = await User.findByIdAndUpdate(id, req.body, {new : true});
res.status(201).json(updateUser);
} catch (error) {
// Handle any errors and send an internal server error response
res.status(500).json({error : " Internal Server Error. "})
}
}
// For deleting data from the database
export const deleteUser = async (req, res)=>{
try {
// Extract user id from request parameters
const id = req.params.id;
// Check if the user with the given id exists
const userExist = await User.findOne({_id:id})
if(!userExist){
return res.status(404).json({message : " User Not Found. "})
}
// Delete the user from the database
await User.findByIdAndDelete(id);
// Send a success response
res.status(201).json({message : " User deleted Successfully."})
} catch (error) {
// Handle any errors and send an internal server error response
res.status(500).json({error : " Internal Server Error. "})
}
}

Step 6 : Create User Routes

Now let’s write code for userRoute.js, which is for defining the routes and mapping them to the corresponding controller functions for user-related operations.

  • First import the express module
  • Then, import controller functions for handling user routes
  • Create a new router instance
  • Define routes and their corresponding controller functions
  • Export the router
// Import the express module
import express from "express";
// Import controller functions for handling user routes
import { create, deleteUser, fetch, update } from "../controller/userController.js";
// Create a new router instance
const route = express.Router();
// Define routes and their corresponding controller functions
route.get("/getallusers", fetch); // Route to fetch all users
route.post ("/create", create); // Route to create a new user
route.put("/update/:id", update); // Route to update a user by ID
route.delete("/delete/:id", deleteUser); // Route to delete a user by ID
// Export the router
export default route;

Now just add these lines in index.js file:

Line number 7 [import route from “./routes/userRoute.js”;] & 

Line number 28 [app.use(“/api/user”, route); ]

import express from "express";
import mongoose from "mongoose";
import bodyParser from "body-parser";
import dotenv from "dotenv";
//Line to to added
import route from "./routes/userRoute.js";
const app = express();
app.use(bodyParser.json());
dotenv.config();
const PORT = process.env.PORT || 5000;
const MONGOURL = process.env.MONGO_URL;
mongoose
.connect(MONGOURL)
.then(() => {
console.log("Database connected successfully.");
app.listen(PORT, () => {
console.log(`Server is running on port : ${PORT}`);
});
})
.catch((error) => console.log(error));
// Line to be added
app.use("/api/user", route);
view raw index.js hosted with ❤ by GitHub

Now your application should be running successfully. 

Now just install Postman to check all the API endpoints. If you haven’t installed the postman. Download it and install on your system from this link: https://www.postman.com/

Now open Postman and start testing all the API endpoints. First let’s test POST HTTP method to insert into database. 

Step 7 : Test API using Postman

  • First Create a New POST Request 
  • Then put URL  : http://localhost:8000/api/user/create
  • Then choose Body -> raw ->json 
  • And Write the json of name, email and address
    {
       “name”:”John”,
       “email”:”john@gmail.com”,
       “address”:”Canada”
    }
  • Now just press on Send and see the Body there is same json 
postman

Now check the database you will see the data in users collection. 

data inserted into database

Now Let’s test the GET API endpoint for getting all data from database 

For that, Just select GET method and provide the URL  http://localhost:8000/api/user/getAllUsers

getting all data from databse

Now let’s update data from database using PUT method provide URL 

  • First Create a New PUT Request 
  • Then put URL  : http://localhost:8000/api/user/update/id
  • Then choose Body -> raw ->json 
  • And Write the json of name, email and address
    {
       “name”:”John Doe”,
       “email”:”john123@gmail.com”,
       “address”:”USA”
    }
  • Now just press on Send and see the Body there is same json 
put method to update data from database

Now For deleting data from data you can just add the new DELETE request and API endpoint : http://localhost:8000/api/user/delete/id

delete user by id

If data is deleted successfully. It will show the message 
{“message “: “User deleted successfully”}